My Blog
About Me
- Name: Ben Winzenz
- Location: Keller, Texas, United States
I grew up near Ann Arbor, Michigan and went to college at BYU (Brigham Young University). In 1992, I took 2 years off from school to serve a full-time mission for my Church (the Church of Jesus Christ of Latter-day Saints) in Frankfurt, Germany. I've been married for 11 years and have 4 beautiful children. I have been working with Exchange since 1999.
Subscribe to this Blog
 Subscribe to my Blog
Contact Me
E-mail me
Other Blogs
MS Exchange Blog
Mark Fugatt's Blog
You Had me at EHLO
David Lemson's Blog [MSFT]
Evan Dodd's Blog [PSS]
KC Lemson's Blog
Michael Palermiti's Blog [PSS]
Michael B. Smith's Blog
Andy Webb's Blog
Chad Gross [SBS]
E2K Security
Glen's Exchange Dev Blog
Bharat Suneja's Blog
Exchange Cookbook
Kevin Weilbacher [SBS]
Sigfried Weber
Susan Bradley's SBS Blog
Tim Rains' Weblog
Robert Hensing's Blog
Robert Scoble's Blog
WitNit
Jim McBee's Mostly Exchange Blog
Ant Drewery
Exchange-ing Ideas - Missy Koslosky
Donna's Security Flash
What's in Store - WinFS blog
Microsoft Security Response Center
Jason Langridge's WebLog - MR Mobile!
Gerod Serafin's Blog
XP Source
Mark's Sysinternals Blog
Jesper Johansson's Blog
ExchangeIS - Ben Hoffman's Blog
Ray Ozzie's Blog
Monad Team Blog
Devin Ganger - (e)Mail Insecurity
Steve Riley's Blog
Henrik Walther's Exchange Blog
Search
Archives
September 2004October 2004
November 2004
January 2005
February 2005
March 2005
April 2005
May 2005
June 2005
July 2005
August 2005
September 2005
October 2005
November 2005
December 2005
January 2006
February 2006
March 2006
April 2006
May 2006
June 2006
July 2006
August 2006
September 2006
October 2006
Exchange 2007 Calendar Concierge
I did an internal presentation a little while ago for some of the folks at our company, and I also presented at the last User Group meeting we had in May. The topic was Exchange 2007 general features (added, removed, deprecated features, etc.). One of the new features that I highlighted (and demo'd) was on the Calendar Concierge features. The main focus was on the new Auto-Accept feature that can now be easily administered. Since I've now implemented this on a few servers, I thought I would outline the steps I took to set this up.
1. Create a new mailbox. This can be done either from MSH (Powershell/Exchange Management Shell) or from within the GUI. From MSH, the command I used is as follows:
[MSH manually create new mailbox]
[MSH] C:\>new-Mailbox -alias somealias -database "Mailbox Database" -name "Conference Room" -resourcetype room –userPrincipalName alias@domain.com –OU Users
This will create a new *disabled* user account that is set up as a Meeting room. Created from within the GUI, the end result is the same, and at the end, it actually shows you the MSH command that it uses (see below this paragraph). Strikingly similar, aren't they? It's nice that when doing it manually, you don't always have to use the proper syntax. For example, in the example below, note the long distinguished name of the Database vs. just the database name in my example. Obviously, the more complex the environment, the more information you would have to provide, but MSH will tell you if it can't find the database.
[GUI create new Resource mailbox]
New-Mailbox -Name:'Name of User' -Alias:'somealias' -OrganizationalUnit:'OU' -Database:'CN=Mailbox Database,CN=First Storage Group,CN=InformationStore,CN=SERVERNAME,CN=Servers,CN=Exchange Administrative Group (FYDIBOHF23SPDLT),CN=Administrative Groups,CN=Org Name,CN=Microsoft Exchange,CN=Services,CN=Configuration,DC=domain,DC=com' -UserPrincipalName:'alias@domain.com' -DisplayName:'Display Name' -FirstName:'First Name' -Initials:'' -LastName:'Last Name' -ResourceType:'Equipment'
Note: either via MSH or GUI, it is important that the mailbox be marked as a Resource by setting the ResourceType parameter. This is what identifies it as a Resource mailbox. This is also what allows you to configure the Resource Settings in OWA (see below)
2. Set permissions for another user to log on and configure the Auto Accept parameters.
Currently, this can only be done via MSH, though I expect that this will change by the time Exchange 2007 RTM's, or possibly prior to that in Beta 2 perhaps. The command to set mailbox permissions via MSH is:
[MSH] C:\>Add-MailboxPermission "Conference Room" -user username_to_grant_access_to -AccessRights FullAccess
3. Finally, the AutoAccept settings can be configured. To do this, log on to OWA, then click the drop-down next to your name and Log on to the Resource mailbox. This is a NEW feature, and is WAY cool! Oh – it also will autopopulate names for you…
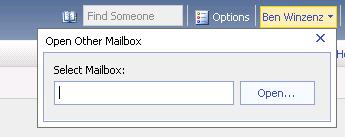
Another Oh – if you are using a popup blocker, you'll need to configure it to allow popups (the other mailbox will open in a new window).
With the new mailbox open, go to the Options, and scroll down until you get to Resource Settings. Note that the Resource Settings are not available on your mailbox, only on resource mailboxes. Configure the options how you would like them and save and exit. Note that there is WAY more flexibility with this than with the current AutoAccept Agent.
That's it!
- posted by Ben Winzenz @ 4:23 PM
PSMDTAG:FAQ: How can I create an Exchange Mailbox?
Jeffrey Snover [MSFT]
Windows PowerShell/Aspen Architect
Visit the Windows PowerShell Team blog at: http://blogs.msdn.com/PowerShell
Visit the Windows PowerShell ScriptCenter at: http://www.microsoft.com/technet/scriptcenter/hubs/msh.mspx
 : 10:58 PM, July 12, 2006
<< Home
