My Blog
About Me
- Name: Ben Winzenz
- Location: Keller, Texas, United States
I grew up near Ann Arbor, Michigan and went to college at BYU (Brigham Young University). In 1992, I took 2 years off from school to serve a full-time mission for my Church (the Church of Jesus Christ of Latter-day Saints) in Frankfurt, Germany. I've been married for 11 years and have 4 beautiful children. I have been working with Exchange since 1999.
Subscribe to this Blog
 Subscribe to my Blog
Contact Me
E-mail me
Other Blogs
MS Exchange Blog
Mark Fugatt's Blog
You Had me at EHLO
David Lemson's Blog [MSFT]
Evan Dodd's Blog [PSS]
KC Lemson's Blog
Michael Palermiti's Blog [PSS]
Michael B. Smith's Blog
Andy Webb's Blog
Chad Gross [SBS]
E2K Security
Glen's Exchange Dev Blog
Bharat Suneja's Blog
Exchange Cookbook
Kevin Weilbacher [SBS]
Sigfried Weber
Susan Bradley's SBS Blog
Tim Rains' Weblog
Robert Hensing's Blog
Robert Scoble's Blog
WitNit
Jim McBee's Mostly Exchange Blog
Ant Drewery
Exchange-ing Ideas - Missy Koslosky
Donna's Security Flash
What's in Store - WinFS blog
Microsoft Security Response Center
Jason Langridge's WebLog - MR Mobile!
Gerod Serafin's Blog
XP Source
Mark's Sysinternals Blog
Jesper Johansson's Blog
ExchangeIS - Ben Hoffman's Blog
Ray Ozzie's Blog
Monad Team Blog
Devin Ganger - (e)Mail Insecurity
Steve Riley's Blog
Henrik Walther's Exchange Blog
Search
Archives
September 2004October 2004
November 2004
January 2005
February 2005
March 2005
April 2005
May 2005
June 2005
July 2005
August 2005
September 2005
October 2005
November 2005
December 2005
January 2006
February 2006
March 2006
April 2006
May 2006
June 2006
July 2006
August 2006
September 2006
October 2006
A 4 yr old's harcut!
And now for a post on the Family front.
We don't need to guess where she learned this from - her older sister has attempted to cut her own hair twice now. Pictures posted in order are:
1. Before the cut. Her hair went *almost* down to her waist.

2. The cut

The second picture doesn't really do justice - she also did a hack job on her bangs. After this, my wife had to take her to a real hair stylist to have it fixed. The "After" pictures:


Of course, she's still CUTE! I'm not sure what possessed her to want to cut her hair, but what's done is done. If you're wondering where they get the scissors from, we do have them put away up in a cupboard, but as you know, 4 yr olds and 6 yr olds are resourceful little buggers! :-)
- posted by Ben Winzenz @ 2:11 PM 1 comments
Microsoft UK: Office Clips
ROFL!
Link to Microsoft UK: Office Clips
I just viewed these, and they are hilarious. Make sure that you watch all the way until the end - there are some funny outtakes included.
- posted by Ben Winzenz @ 11:16 AM 0 comments
Creating a new mailbox using Powershell and specifying the password
So you want to create a new mailbox with Exchange 2007. No biggie - you can create it either using the Management Console (GUI), or via the Management Shell (Powershell). That's boring, though. What if you want to create it via the Shell AND specify the password? Ok - let's do it.
First, let's take a look at the Help for the new-mailbox command usage.
New-Mailbox -Name <String> -Database <DatabaseIdParameter> -OrganizationalUnit <OrganizationalUnitIdParameter> -Password <SecureString> -UserPrincipalName <String> [-Alias <String>] [-DisplayName <String>] [-DomainController <String>] [-FirstName <String>] [-Initials <String>] [-LastName <String>] [-ManagedFolderMailboxPolicy <MailboxPolicyIdParameter>] [-MobileMailboxPolicy <MailboxPolicyIdParameter>] [-ResetPasswordOnNextLogon <$true | $false>] [-SamAccountName <String>] [-TemplateInstance <MshObject>]
Notice that the -Password option needs to be entered as a Secure String. That means that you cannot enter it as plain text during the command. Now, let's take a look at one of the examples provided in the help.
EXAMPLE
$password = Read-Host "Enter password" -AsSecureString
New-mailbox -UserPrincipalName chris@contoso.com -alias chris -database "Storage Group 1\Mailbox Database 1" -Name ChrisAshton -OrganizationalUnit Users -password $password -FirstName Chris -LastName Ashton -DisplayName "Chris Ashton"
This example shows how to create a new mailbox using the -password option. Note that the password is not actually set to $password. Rather, $password is a variable that has been set by the first command. As I mentioned, when you enter the password, it cannot be in plain text. If you try to, you'll receive the following error.
New-Mailbox : Cannot bind parameter 'Password'. Cannot convert value "password" to type "System.Security.SecureString". Error: "Invalid cast from 'System.String' to 'System.Security.SecureString'."
At line:1 char:70
As indicated in the example, you need to define the $password variable. This is done by using the first string from the example. When you run the command
$password = Read-Host "Enter password" -AsSecureString
you will be presented with a prompt stating
Enter password: ********** (note that the password I entered is entered as a secure string - the text is hidden with asterisks)
Once you've entered this password, it's stored as a secure string. You now just need to specify the password using the $password variable you've defined. The downside to this method is that you would have to use the same password for each user that you created using this variable. Note that the following fields are required when creating a new user account. Also note that if you are creating a linked mailbox, a shared mailbox, or a resource mailbox, a password is not required as the account will be disabled.
Password
Database
UserPrincipalName
Name
OrganizationalUnit
Everything else is optional.
- posted by Ben Winzenz @ 10:57 AM 0 comments
More on Windows Mobile, Certificate Checking and the continual password prompt
It seems that my post on "Hacking your Windows Mobile 5.0 Registry" gets read a lot. In fact, about 50% of the traffic to my blog comes from visits to that page (most of it from search engine referrals). Based on some comments, though, I feel like I need to clarify something.
The main reason that I blogged about the ability to disable certificate checking in Windows Mobile 5.0 is because I use a Wildcard certificate (*.company.com) at my current company. Unfortunately, wildcard certs are NOT supported in Windows Mobile 5.0. This means that even if the certificate is installed properly, Windows Mobile 5.0 will not properly use it and will instead display an error stating that an invalid certificate is installed. In order to get synchronization working with MY environment, I had to disable certificate checking. This still allows me to use SSL, but it tells Windows Mobile not to check if the certificate is valid (basically, the hostname doesn't have to match).
However, if you are using a self-signed certificate (generated by an internal Certificate Authority), there is NO need to add this registry key. Windows Mobile 5.0 fully supports self-signed certs, and has made it MUCH easier to install your own certificate. An abundance of posts provide helpful information on how to install a certificate on Windows Mobile 5.0 in many different ways, from copying and clicking a .cer file, to installing as a .cab file, to installing using a signed version of the spaddcert.exe tool (Sprint and Verizon). Think of it this way. If you are using a self-signed cert for, say, OWA access, what happens when an external client tries to log in to OWA? Internet Explorer indicates there is a problem with the certificate. How do you get around that certificate error popping up each time you visit the page? You install your certificate into IE's certificate store as a Trusted Root Certificate Authority. The same action is required with Windows Mobile, with the exception that if you want to synchronize at ALL using SSL, you have to install the cert (or disable SSL - not recommended).
What prompted this post? I've had some questions about the original post that indicated folks had disabled certificate checking, only to be continually prompted for a password. That's annoying! (the continual password prompt, not the questions!). The common thread I've seen in each case so far, though, was that the issue was one with the certificate. In at least one case, disabling SSL (as a test) allowed sychronization to work (a sure sign that the issue is with the cert).
What do you do if you are continually being prompted for a password? Here is a list of things to check.
1. Are you sure that you have installed your certificate as a root certificate on your Windows Mobile device? Windows Mobile devices also have a certificate store, which is viewable by the user. Check your device for the exact location (I believe it may display in a different location depending on if you have a PocketPC-based device, or a Smartphone-based device), and make sure that your certificate shows up there.
2. Have you made sure that the server name in the ActiveSync settings *exactly* matches the one that's on the cert? This is what disabling certificate checking is supposed to fix (a wildcard cert won't match exactly), but since disabling cert checking does decrease security, it shouldn't be done unless absolutely necessary.
3. If you disable SSL on your Windows Mobile device, does synchronization work and your password get accepted?
4. Does the name of the server you are entering in ActiveSync exist in external and internal DNS?
5. Have you made sure that your cert is indeed valid, and not expired? IE should show you any issues from this side of things.
If I can think of anything else, I'll edit this post. I've also asked the folks on the Windows Mobile blog to comment on what might cause the looping password.
- posted by Ben Winzenz @ 2:01 PM 12 comments
Accessing another mailbox via OWA – Exchange 2003 vs. Exchange 2007
No doubt many of you know how to access another user's mailbox via OWA when using Exchange 2003 (or prior).
To refresh your memory, the format that is used in Exchange 2003 is
http(s)://server.domain.com/exchange/aliasofusertoopen
This will result in you being prompted for your credentials, and as long as you have full mailbox rights, you'll be able to open that mailbox. You can also specify to only open a specific folder, for example:
http(s)://server.domain.com/exchange/aliasofusertoopen/calendar
In Exchange 2007, this method of access no longer works. Exchange 2007 changed the OWA interface yet again (but for the better, I promise!), so the method for accessing another mailbox has also changed. The main change here is that you no longer use the /exchange vdir. Instead, there is a new /owa vdir that gives you the new interface. I had previously though that you could still use the old /exchange directory (it still exists!), but it appears that /exchange simply redirects you to the /owa directory. With these changes, you now have 2 options.
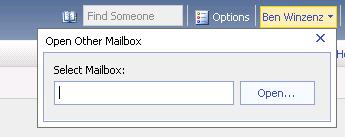
First, you can use the slick new interface within OWA to open another mailbox (I've briefly mentioned this in the past. The attached picture shows how you open another mailbox. Note that in OWA, your mailbox name will be displayed in the upper right-hand corner, with a drop-down menu. Clicking on your name will bring up the dialog box as shown in the picture. You simply type in the name of the mailbox you want to open, and then click the Open button. As long as you have rights to the other mailbox (I've already covered how to grant rights to other mailboxes in previous posts), the other mailbox will then open up in another window.

If you don't want to open the entire mailbox, it is still possible to open just a single folder, but the URL structure is different. Thanks to KC Lemson, and Tim McMichael for taking the time to look up this information.
The URL format you would use to open another user's calendar is as follows:
http://server.domain.com/owa/user1@domain.com/?cmd=contents&module=calendar
where user1@domain.com is the other mailbox that you want to open, and module=calendar indicates that you want to open the calendar. Other modules you could specify include inbox, contacts, etc.
After you hit go/enter, you will be prompted for your credentials to log on to user1's calendar. Worth noting here is that in the beta2 build at least, even though I've enabled Forms-based authentication with the ability to log on with only the username, in order to make the above work, I had to either log on using domain\username, or user@domain.com.
- posted by Ben Winzenz @ 10:45 AM 2 comments
Changing DSN and other Quota messages with Exchange 2007
Many an admin has wondered if DSN (Delivery Status Notifications – Message Delays and NDRs) messages, or Over-the-limit quota messages could be modified. In versions of Exchange prior to Exchange 2007, the answer has always been no, or at least there was no official supported way to do this. I've seen a few utilities to modify the quota messages, but definitely nothing to modify the DSN messages. Thankfully, with Exchange 2007, you now have the ability to add/modify TONS of this information. A few examples.
Modify DSN messages.
Exchange allows you to modify two type of DSN messages. Those associated with 4.x.x error codes (400-level errors codes are transient, retry-able error codes – something like 421 service not available), and those associated with 5.x.x error codes (500-level error codes are permanent fatal errors – like 550 relay denied)
The usage of the MSH command to modify a System DSN is as follows. We'll change the relaying denied message (that's my favorite).
The format of this command is:
New-SystemMessage -DsnCode <EnhancedStatusCode>-Internal <$true | $false> -Language <CultureInfo>-Text String> [-DomainController <String>] [-TemplateInstance <MshObject>]
Following that format, we input the following:
New-SystemMessage -DsnCode 5.7.1 -Language En -Internal $false -Text "Whatever text you want to put in here"
Once you hit Enter, it will now save it as a Custom DSN message for the DSN code that you specified.
If you later want to remove your custom DSN message, you can either issue the command
Set-SystemMessage –identity –original $true, where an example of the identity would be En\External\5.7.1
Modify Quota Messages
Ok – there are several different quota messages that can be configured, including:
* WarningMailboxUnlimitedSize Issued when a mailbox that has no prohibit send quota or prohibit receive quota exceeds the specified mailbox warning limit.* WarningPublicFolderUnlimitedSizeIssued when a public folder that has no prohibit send quota or prohibit receive quota exceeds the specified public folder warning limit.* WarningMailboxIssued when a mailbox that has a prohibit send quota or prohibit receive quota exceeds the specified mailbox warning limit.* WarningPublicFolderIssued when a public folder that has a prohibit send quota or prohibit receive quota exceeds the specified public folder warning limit.* ProhibitSendMailboxIssued when a mailbox that has a prohibit send quota exceeds the specified mailbox size limit.* ProhibitPostPublicFolderIssued when a public folder that has a prohibit send quota exceeds the specified public folder size limit.* ProhibitSendReceiveMailBoxIssued when a mailbox that has prohibit send quota and prohibit receive quota exceeds the specified mailbox send and receive size limit.
The format of the command is:
New-SystemMessage -QuotaMessageType <QuotaMessage> -Language En -Text "Text string"
As an example, if you want to change the quota message that applies to mailboxes that have a limit that prohibits both sending and receiving mail, you would use the following command.
New-SystemMessage –QuotaMessageType ProhibitSendReceiveMailbox –Language En –Text "Put your text in here"
Have fun with these! I for one am glad that this capability will now be present in Exchange.
- posted by Ben Winzenz @ 10:06 PM 2 comments
